Sunday, 5 February 2012
Week 5 - Machine Embroidered Dragon
Tuesday, 9 December 2008
Wednesday, 19 November 2008
Thursday, 31 July 2008
the finished book
Here's my finished book - standing about 7 inches high -

Over the next week or two I'll post some of the pages
....reading it through I've just realised how many times "lunch" appears...strange that...
putting my fabric book together - part 2
I opted for rivets which proved just as much a pain as buttonholes, some folded over smoothly, some just went Blat! the blat ones I hope will remain hidden.

I then needed some small separation between the pages so they didn't pack down tightly together. I had some nylon macrame cord and thought of tying a knot in it between pages


I got half way through - pull the cord, tie a knot, pull the cord through some more - tie another knot - and decided it looked tacky

so it was - undo knot, pull cord through, undo another knot....
then I spied these almost flat wooden beads, I fallen for the colour at a bead show.

I scrapped the stiff macrame cord in favour of some bright blue Russian braid, I was reaching the home straight til I found the holes in the beads were just a tad small to feed the braid through smoothly, so it became - snip the end to a point, feed through the bead and snip the now ragged end to a point again -

you can see what I mean about a whopping big book!

I'll take a photo of the finished book tomorrow.
putting my fabric book together - part 1
I started what was to be my quilt on my birthday in March 2007, but after about two months of weekly squares, it was obvious that this was going to be one whopping big quilt...I didn't really want it to be a bed quilt and I'd long since run out of wall space.
So the plan changed to creating a fabric journal of the squares.
(now instead of a whopping big quilt, I have a whopping big book!)
Of course the year passed before I'd finished stitching, March turned into May before the pages were finished, then the problem was how to put them all together.
Because of the quilt idea, I'd started with squares which were to be joined together, with the change of plan I needed to place them back to back to form book pages.
The squares were made from hand painted cotton with quilting fibre backing.

I decided to attached them to fabric backing - which meant more hand stitching on top of the work I'd already done:

The fabric was folded wrong side out, so the two pages were facing each other inside, then stitched top and bottom to make a pocket:

The pocket was then turned right sides out:

I made a border to cover the raw edge

This was turned and the raw edge of the pocket placed inside and stitched

I still had no firm idea of how all this was going to be joined together...
to be continued...
Saturday, 25 November 2006
Fabric Book exchange


Remember all those pages I made with the painted and embroidered pictures of ladies lunching.
I finally got around to putting together my book of all the pages I received in the swap.
Toni made us all a cover that wrapped completely around the pages.
I joined the paged by sewing through all the layers, separating each page with beads then going back through the layers and tying off at the back
I've uploaded all the individual pages to the Ladies Who Lunch set on Flickr.com
Dawn's Birthday Book


I've just finished uploading to Flickr the fabric post cards made by our Ladies Who Lunch group for Dawn's birthday book.
I just wanted to show these pages so you could see the book open,
the rest of the pictures can be found at the Ladies Who Lunch Set on Flickr.com
Technorati tags:
textiles
fabric books
Saturday, 18 November 2006
just a taster
Tuesday, 18 July 2006
receiving the pages

...and here are the girls showing the pages they received from me
Some of the comments on flickr were wondering how I will bind it -
one of the swap ladies made us each a fabric cover, she made very wide covers with the idea that we would wrap the covers right around the stack of pages and close with a button, but even with the width she has allowed I think the pages will make too thick a stack to fit in the cover.
I also remember seeing a fabric book with beads between each page as a spacer which I rather liked, I think they need to have a separation or maybe a stiff cardboard spacer between them - I've ordered Pam Sussman's book from Amazon so might wait til it arrives and gather ideas.
fabric books - what not to do
To save rethreading the machine, I was going through each page and sewing all the red thread, then again with all the brown threads etc.
I got so carried away at one stage that I didn't notice I'd picked up two pages and I managed to satin stitch them both together, EEEEKKK!!!!
(well, I said something a little stronger than eeeekk)

the top page was OK, I just had to unpick and restitch along the same lines, but the bottom page was left with a row of tram tracks right through my coffee cups and up the bodice of the girls dress

I was able to cover the lines through the dress with sequins but not the other unpicked lines, so I decided to keep this page for myself.
I was at the stage where I couldn't face the idea of painting another page!!
fabric book
Last Saturday I met with the Ladies Who Lunch and we had a wonderful Christmas in July party and exchanged our pages, the pages were all so clever and I'm so lucky having such talented friends. I'll take pictures of the pages I received and show them later this week.
for today, here are the remainder of my pages - altogether they made quite an impressive stack!
Edited 8 August:
I've been reading Susan on Case Notes from the Artsy Asylum
In todays' post she has asked that we choose a post from our blog that we think deserves to be highlighted, edit it to add a link to her post and before the end of today (8th) send a TrackBack and 'wait for the magic to happen'
Not sure if Australia is a day ahead or a day behind the US, so I may not get this right.I'm not even sure if I'm getting the trackback thing right, haven't done this before but ...I was really pleased with my pages so would like to show them off to a few more people..so here goes!!!
Technorati tag: textiles


Sunday, 4 June 2006
fabric books
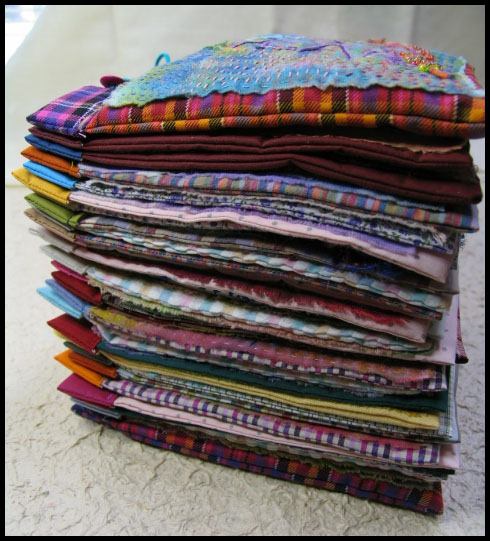
In January 2005, our little lunch group decided to have a fabric book round robin
(hate to admit that I was the one who came up with the bright idea)
15 of us decided to take part, we would work on it all year, each of us making 15 pages, then we'd exchange pages in December at our xmas party.
Except that like all good plans - in December no-one was ready, so we decided to have a Christmas in July 2006 party and exchange pages then.
So what am I doing? 17 months since the birth of the bright idea and one month away from the party..... making pages of course.
My problem is I keep changing my mind about them, I don't want it to be a mish mash of unrelated pages, I want to keep a theme running through all the pages.
I started off with a crazy quilt theme like these:


but after making 3 of them I decided they weren't *me*
then I tried something like this

but couldn't think of enough to keep the *play* theme alive through 15 pages, and I would have gone barmy buttonholing around 15 sets of letters
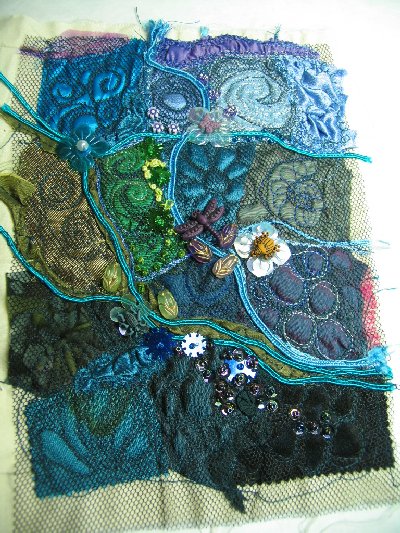
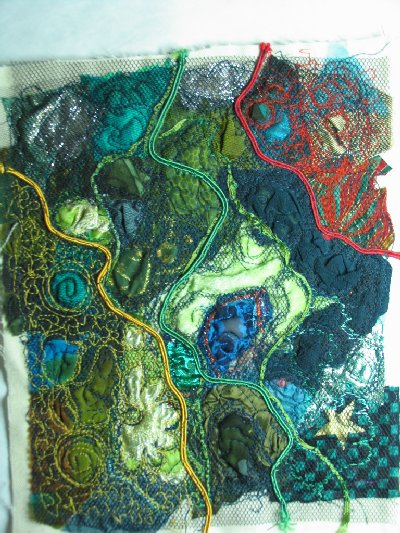
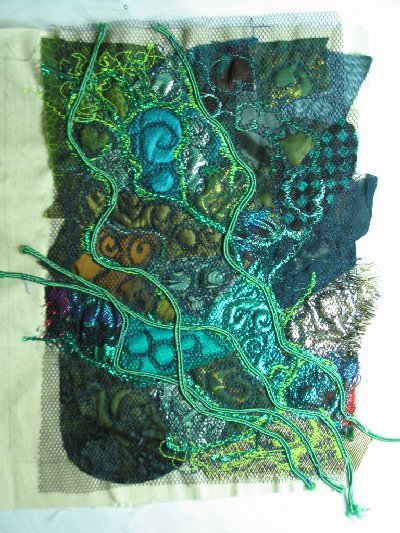
next was one of my favourite techniques - squishing little pieces of fabric around while stuffing wadding under them and free machining over the lot -
At first I thought of doing a different one for each lady according to the area they lived, this was one of the beaches.

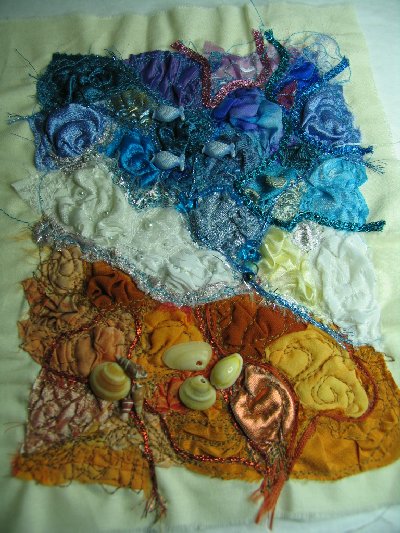
this was for one of the gardeners

then I just started on landscapes generally:


then...
you guessed it...
I went off that idea
what next?
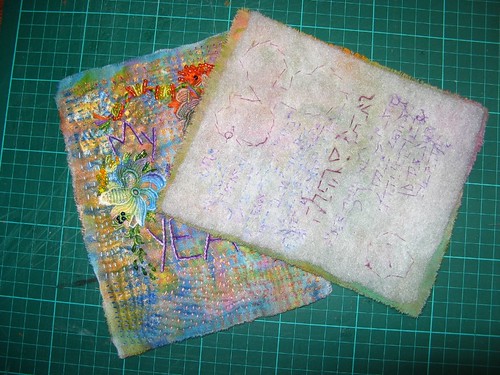
I started messing with painting on the fabric, this wasn't as easy as I thought, it is so hard to get a *flow* happening with the paint, I couldn't do nice sweeping brushstrokes as you do on paper, the fabric *grabbed* the paint, which is why artists gesso their canvas first, but I didn't want to finish up with a stiff hard canvas surface, I wanted a soft paged book.
These were the first attempts:


so at last I think I have a theme and a technique I'm happy with, I have a definite "Lunching Ladies" idea happening.
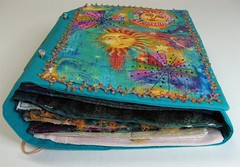
Here's the process:
The pages are painted, padded with wadding, backed with another piece of thin fabric then free machined embroidered around the outlines. (the thin backing fabric is so the wadding will not catch in the machine)
Then I add beads, sequins and hand embroidery - the stitches (french knots with 5 twists) are done in thick crochet cotton and are really hard to pull through the layers of paint and wadding, I've been using pliers to pull the needle through each stitch, which is really hard on the hands.
Once all the surface decoration is finished, then I'll add a separate backing and binding.


textiles